No-Makeup Makeup: The Fall 2026 Routine for Skin That Looks Like Skin
No-makeup makeup for fall 2026 is skin that looks like skin. Here is the skincare-first routine and the four makeup steps, with the deals we verified.
2026-09-06
Half or Nothing
50% off or it doesn't make the page.
2026-09-24 · Written by Dann Nazario · 17 min read
All of this research started with something pretty simple: how many options we have today for doing our nails. Between regular polish, gel, builder gel, acrylic, and all the trends that keep popping up, there is so much to try, and sometimes a little too much to choose from.
I do my own nails at home, sometimes with regular polish and sometimes with gel, as you can see in the photos in this post. So while I was doing all this research, I gathered the things that really seemed useful to me and that I would consider using or buying myself.
I wanted to share them because, let's be honest, nails, designs, and new trends always end up catching our eye. And if you are going to try something new, you should at least have an idea of what you need before you start.
And, as always, I searched for products I found at Half or Nothing related to the different nail methods you will find here. That way you can explore the options that best fit what you want to do, and if you find something you like, maybe even get it for a lot less.
I hope it helps, gives you some ideas, and above all, that you find something you want to try.
In This Article
A French tip is a pale, natural-looking nail with a defined band of color across the free edge. You can get it at home with acrylic, with gel, or by painting the line yourself. Painting is the cheapest and easiest to start with, gel gives you a glossy, long-wearing finish, and acrylic builds the most length. Here is how to pick a shape, prep, and keep your nails happy with each method.
| Method | What sets it | Skill level | How it comes off | Good for |
|---|---|---|---|---|
| Paint | Regular polish air-dries | Beginner | Regular polish remover | A low-cost first try, quick redos |
| Gel | Cured under a UV or LED lamp | Beginner to intermediate | Acetone soak | A glossy finish and color designs |
| Acrylic | A liquid and powder mix that hardens on the nail | Intermediate | Acetone soak or filing | Adding length |
New to doing your own nails? Start with paint. Want color and shine that lasts? Try gel. Want extra length and ready to practice? Try acrylic.
The shape sets how hard the tip line is to draw and how the finished look reads on your hand.
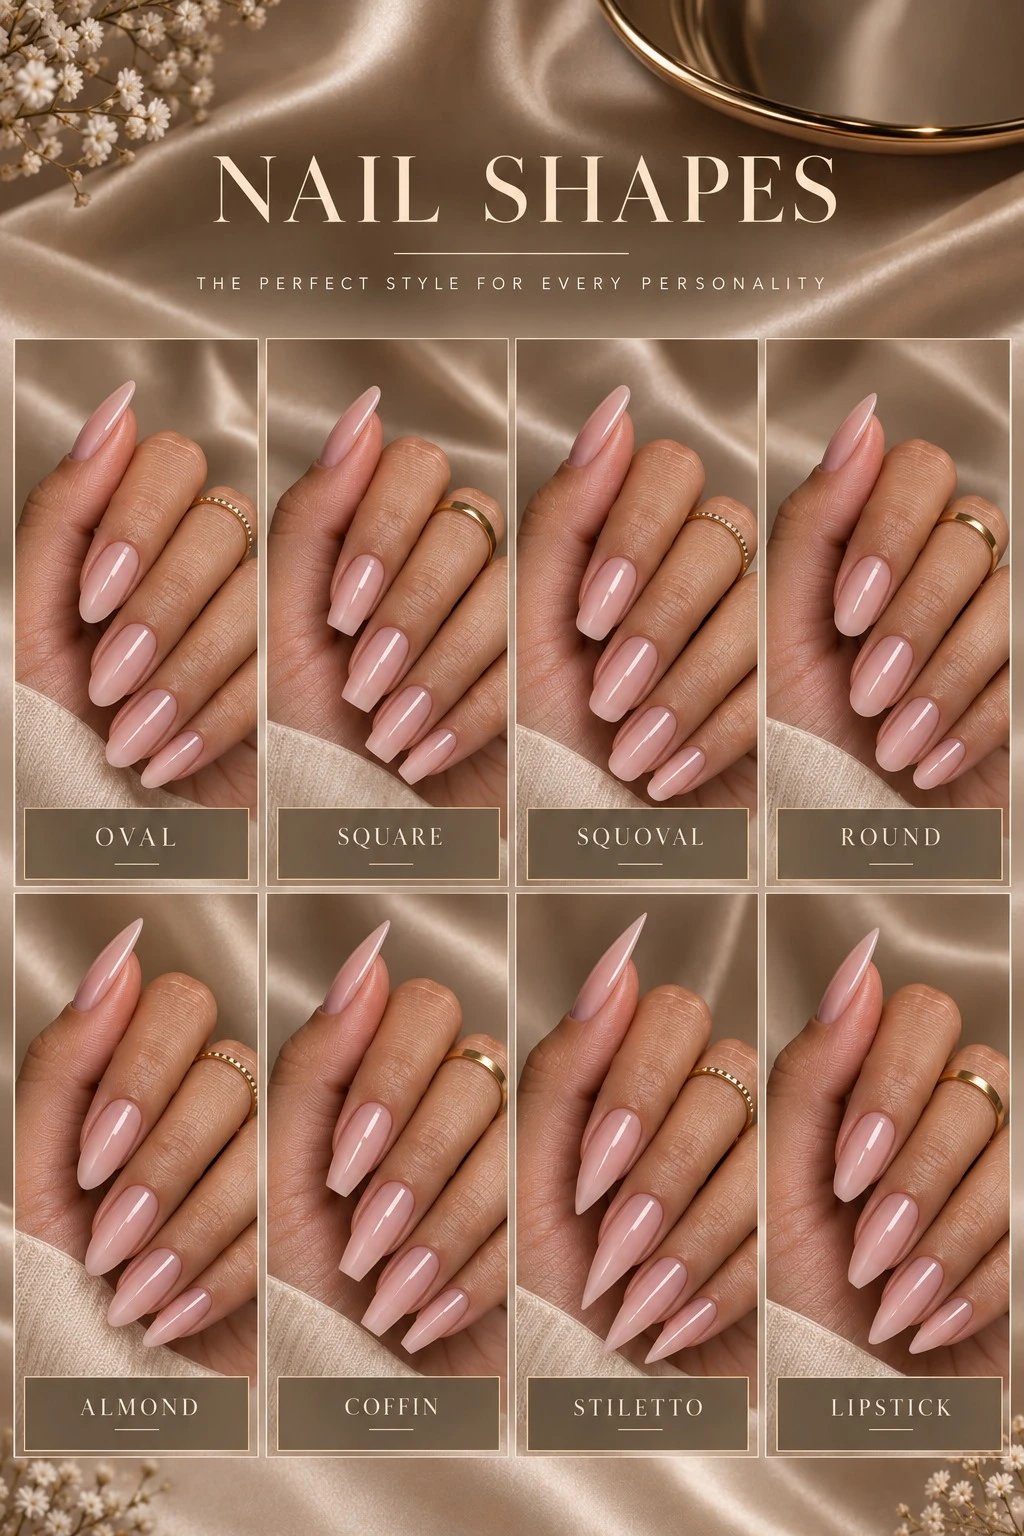
| Shape | What to know |
|---|---|
| Oval | An elongated round with a rounded tip. It flatters shorter fingers and gives the French a soft, classic feel. |
| Square | A straight free edge and sharp corners. The original French shape, and the easiest to do freehand because the tip line is a single straight swipe. |
| Squoval | A square with the corners rounded off. It chips less at the corners and is the most forgiving shape for a first attempt at home. |
| Round | Follows the curve of your fingertip. It suits short natural nails and a thin micro-French. |
| Almond | Tapers to a rounded peak. It needs length, and the tip line has to follow the curve, so a guide sticker or pre-shaped tips earn their place. |
| Coffin | Also called ballerina. It tapers to a flat, squared-off tip, needs length, and chips sooner than square or oval. |
| Stiletto | Comes to a sharp point. The most dramatic French and the least practical, since it catches on everything. |
| Lipstick | Cut on a slant. A statement shape and a hard one to do at home. |
If you plan to paint the line yourself, pick square, squoval, or oval. For almond or coffin, lean on gel or acrylic extensions.
Prep is the step people skip, and it is the reason a manicure lifts in two days instead of two weeks.
Start dry and bare. Take off any old polish, and if you had gel on, soak it off rather than prying it, which pulls up layers of natural nail. Shape the free edge by filing in one direction. The American Academy of Dermatology recommends an emery board and a smooth, snag-free edge.
For the cuticles, soak your hands for a few minutes, then push the skin back gently with a cuticle pusher. Do not cut the cuticle. The AAD advises against removing it because that can damage the nail, and its gel manicure tips say cutting the cuticle could lead to inflammation and infection.
Finish with a light buff, brush away the dust, and wipe each nail with isopropyl alcohol. Skip hand cream until the polish is on, since oil is what makes product peel.
Tweezerman Cuticle Pusher & Nail Cleaner $9.00 (was $18.50), 51% off. A stainless steel pusher for the cuticle step, rated 4.6 stars from 750 reviews. View on Amazon.
The cheapest route. Lay down two thin coats of a sheer pink or nude and let it set. Then add the white line: a guide sticker gives a clean straight edge, and a thin striping brush follows a curve. Keep the white light, one or two passes, then finish with a top coat and cap the edge.
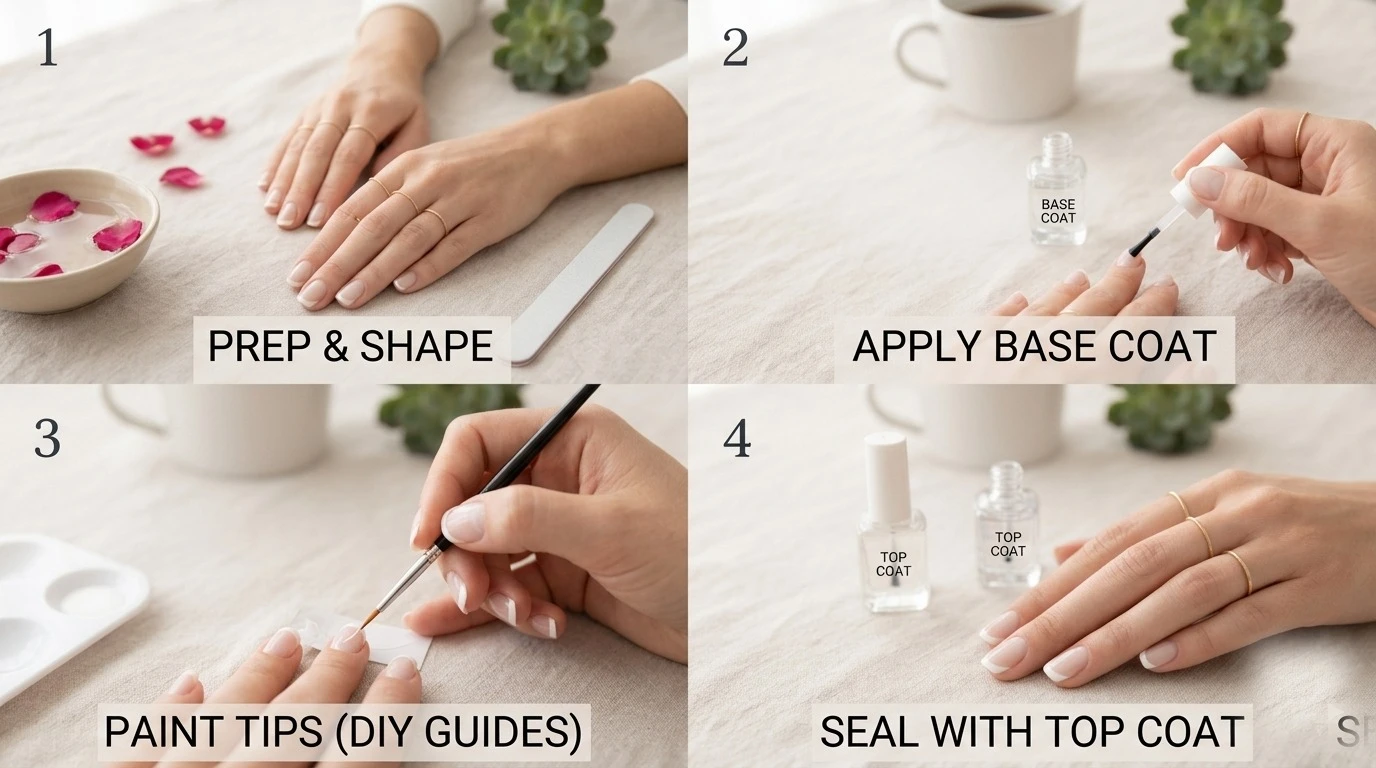
If you would rather skip the painting, a ready-made French tip is the shortcut.
Gel gives you a glossy, long-wearing manicure and lets you go beyond French. The steps are base coat, color, then top coat, each cured under a lamp for the time on the bottle. Thin layers cure better than thick ones, and capping the free edge with each coat keeps the tip from peeling.
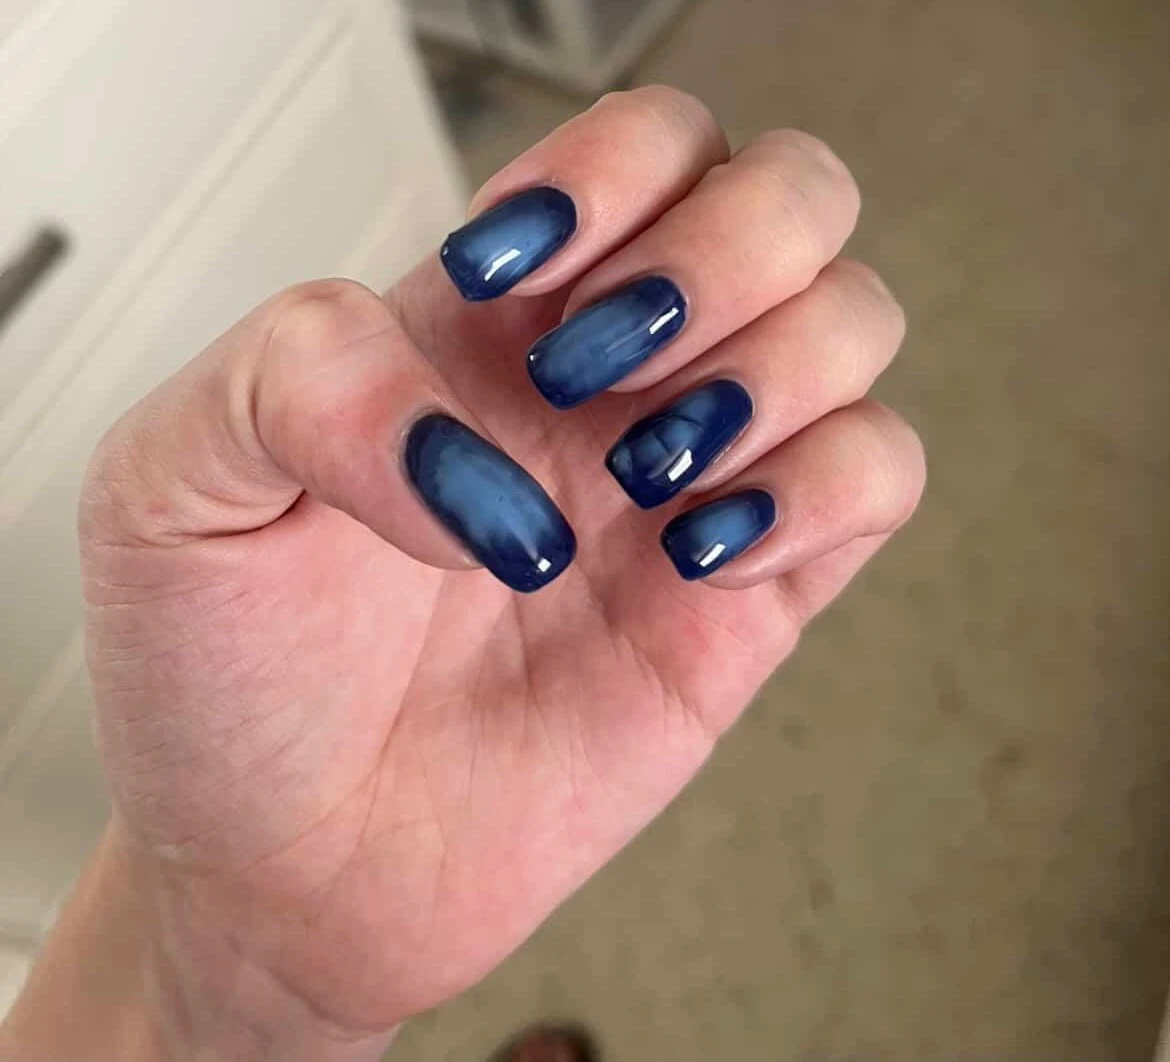
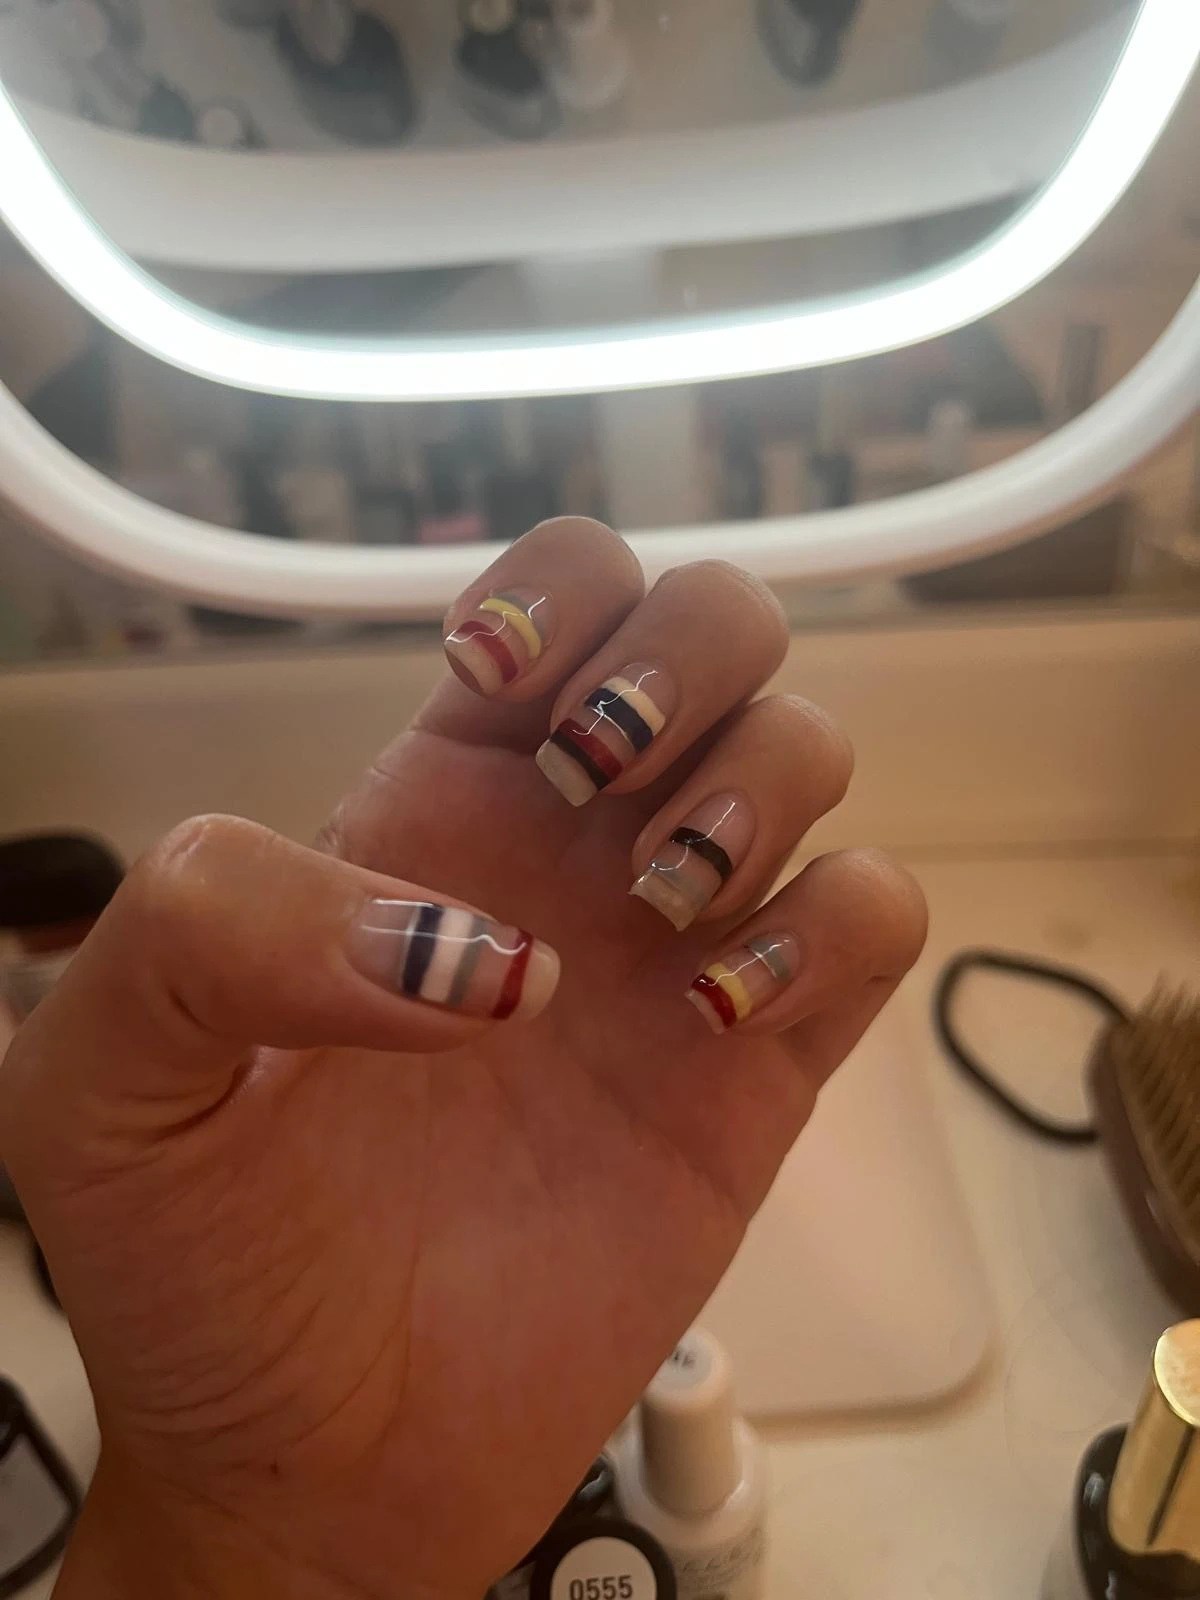
Both looks above were done at home with the same five things: builder gel, base coat, gel polish, top coat, and a lamp. NailKnowledge describes builder gel ("builder in a bottle") as sitting between a soft and a hard gel: strong enough to reinforce natural nails and build very short extensions, while still soaking off.
The two looks above line up with what editors and nail artists are seeing this year.
Aura and jelly. Marie Claire's summer 2026 nail trends includes aura ombre, a soft, diffused gradient. Nail artist Emilie Sanscartier, founder of the gel brand Gelcare, says aura ombre will keep growing, especially with chrome or sheer jelly finishes. Manicurist Olha Shtanhei predicts glazed jelly nails, sheer and glossy, will be the look of summer 2026.
Stripes and micro French. Who What Wear has noticed a rise in simple line art since the start of 2026, and says striped French tips look especially good on short, rounded nails. Its 2026 nail trends also list micro French tips, a minimal take on the classic with a thin tip line.
AIMEILI 5 in 1 Builder Base, HEMA Free Clear Builder Nail Gel $5.99 (was $11.99), 50% off. A clear builder gel and base for nail extensions, soak off, rated 4.4 stars from more than 6,000 reviews. View on Amazon.
A few easy habits keep your nails and skin in good shape while you enjoy gel.
The lamp: short and simple. The FDA views nail curing lamps as low risk when used as directed by the label and suggests no more than 10 minutes per hand, per session. Dr. Saira George of MD Anderson agrees the risk from nail dryers appears to be low.
The American Academy of Dermatology recommends a broad-spectrum, water-resistant sunscreen with an SPF of 30 or higher on your hands before the lamp. Its artificial nails guide adds that an LED light emits lower levels of UV than a UV curing light and cures more quickly.
Give your nails a break. The AAD says to try not to wear nail polish for one to two weeks or longer between manicures, and to moisturize nails and cuticles with petroleum jelly several times a day. Cleveland Clinic dermatologist Dr. Chey Ranasinghe agrees it is important to give your nails a break and suggests gel for a few special occasions a year instead of every two to three weeks.
Listen to your skin. Some people are sensitive to ingredients in gel products. The Asthma and Allergy Foundation of America says a reaction shows up as redness, swelling, or blistering around the nail. If you notice that, take the product off and treat the area with an over-the-counter cortisone cream. It usually clears up in 1 to 3 days, and an allergist can help if it does not.
If gel is not for you. The AAD says traditional polish is a good option if you have recurring nail problems, since acetone is required to remove gel. The painted route above needs no lamp.
Acrylic is a good pick when you want extra length. The American Academy of Dermatology says artificial nails can lengthen short nails and make fingers look long and slender. The FDA explains they are made mainly of acrylic polymers, formed by reacting acrylic monomers with polymers. In a kit, that is the liquid and the powder you combine on the nail. A pre-formed French tip skips the freehand smile line.
Naio Nails, a nail supply brand, says applying acrylic takes time and patience but can be learned with practice. Its basics list: cuticle pusher, file and buffing block, nail prep (dehydrator), acid-free primer, dappen dish, acrylic brush, lint-free wipes, powder, liquid, and top coat. Its steps, in short:
| Step | Action | Good to know |
|---|---|---|
| 1. Prep | Gently push the cuticle back, buff the shine off the nail, and remove the dust. | Acrylic will not stick to any cuticle left on the nail bed. |
| 2. Tip (optional) | Fit a nail tip that sits snugly, glue it, cut it to length, and file the shape. | Do not file upwards from underneath the tip, since it can pop off. |
| 3. Dehydrate and prime | Apply nail prep (dehydrator) to the whole nail bed, then an acid-free nail primer. | The dehydrator air dries quickly and leaves the nail matte. |
| 4. Make the bead | Dip the brush in the liquid in a dappen dish, wipe off the excess, then draw the brush through the powder to form a ball. | It should look like a tiny golf ball. If too wet or dry, start again. Naio suggests a medium-speed liquid for beginners because it dries more slowly. |
| 5. Place it | Set the bead near the cuticle and bring it down toward the tip. | Tilt the nail down so the acrylic does not flood the cuticles. |
| 6. Sculpt | Press the brush flat and gently move the acrylic to smooth bumps and spread it evenly. | Keep your brush clean by dipping it in the liquid as you go. |
| 7. Finish | Repeat for full coverage, then finish with a top coat. | Choose an air-dry, gloss, or matte top coat. |
Acrylic asks a little more care from your natural nails, and a few simple habits make it easy.
Finish every route with a top coat, and cap the free edge each time by swiping the brush along the very tip of the nail. That thin seal on the edge is what stops the tip from peeling first.
Use cuticle oil every night, one drop per nail, massaged into the base and sidewalls. It keeps the nail plate flexible so it bends instead of snapping, and stops the cuticle from splitting. Follow every hand wash with hand cream, since water and dish soap dry nails out, and wear gloves for dishes.
Biotin is a common add-on. A 2024 review in Skin Appendage Disorders by dermatologists Ines Zaraa and Bertrand Richert says biotin has been shown to improve the appearance, strength, and brittleness of nails, and cautions that recommendations are only as solid as the available evidence.
The AAD's page on removing gel polish at home, featuring dermatologist Dr. Shari Lipner, says to skip picking or filing the gel off. Her steps:
| Step | Action | Good to know |
|---|---|---|
| 1. Protect the skin | Rub petroleum jelly on your cuticles and the skin around your nails. | Gather 100% acetone, cotton, plastic food wrap, a washcloth, and a towel. |
| 2. Soak the cotton | Cut cotton to nail size and soak it in 100% acetone. | Acetone can damage surfaces, so line your work area with plastic wrap and a towel. |
| 3. Wrap | Place the cotton on each nail and wrap it tightly in plastic food wrap. | Plastic wrap makes a tighter seal than foil, so the acetone is less likely to drip. |
| 4. Wait | Leave the wrap on for 10 minutes. | Most or all of the gel polish should be gone when you unwrap. |
| 5. Wipe | Remove any leftover polish with a washcloth run under warm water. | Rub only the nail and avoid the skin around it. |
| 6. Aftercare | Rub petroleum jelly into your cuticles and the skin around your nails every day for seven days. | This helps reduce irritation caused by the acetone. |
Dr. Lipner cautions against orange sticks, which can injure your nails and cause white spots. No acetone? The AAD's other option is to let the gel grow out and clip your nails once a week.
The golden rule: never pry, pull, or bite acrylic off. Healthline, medically reviewed by Cynthia Cobb, DNP, APRN, WHNP-BC, FAANP, notes that removal done incorrectly can lead to nail thinning, dryness, and even infections. The AAD says artificial nails often need an acetone soak or filing to come off, and Healthline calls the acetone soak the most common way at home. You need 100% acetone, a file, cotton balls, foil, and a cuticle pusher.
| Step | Action | Good to know |
|---|---|---|
| 1. Trim | Trim the excess length of the acrylic. | The less nail you have to work with, the better (L'Oreal Paris, in Spanish). |
| 2. File | File the surface to remove the top coat. | Healthline starts here before any soaking. |
| 3. Protect the skin | Apply petroleum jelly around your nail beds. | Keeps the acetone off your skin. |
| 4. Soak the cotton | Soak a cotton ball in 100% acetone for each nail. Each one should be dripping wet. | Use pure acetone, not a remover with added ingredients. |
| 5. Wrap | Place a cotton ball on each nail and wrap each fingertip in foil. | No foil? Healthline says you can soak your nails in a small bowl of acetone. |
| 6. Wait | Let it sit for 10 to 15 minutes. | L'Oreal Paris says about 20 minutes, and 5 to 10 more if it is not soft yet. |
| 7. Push off gently | Remove the foil and cotton, then gently push off the softened acrylic with a cuticle pusher. | Avoid metal tools. If your nails hurt, stop and soak longer. |
| 8. Repeat and wash | Repeat if needed and wash your hands thoroughly. | Follow with cuticle oil or a thick hand cream daily, and let your nails rest a couple of weeks before the next set (Healthline). |
Healthline says a salon may be the better choice if your acrylics are new or very thick, you see signs of infection (redness, swelling, pus), or you are unsure how to do it safely. L'Oreal Paris also calls professional removal the safest way.
Squoval, a square with softened corners. The tip line is a straight swipe, and the rounded corners chip less than a true square. Almond and coffin curve, so they are easier with gel or acrylic extensions.
Use a French guide sticker for square and squoval shapes: place it where you want the line, paint the white above it, and peel it off before the polish fully dries. For curved shapes, a thin striping brush and a slow hand work better.
The AAD says to choose soak-off gel instead of acrylic to reduce damage. Gel can still cause brittleness, peeling, and cracking, but it is more flexible than acrylic, so your own nails are less likely to crack. Breaks between sets and gentle removal help either way.
It may help some people. A 2024 review in Skin Appendage Disorders reports biotin has been shown to improve nail appearance, strength, and brittleness. It also notes biotin can interfere with certain lab tests, including troponin and thyroid tests, so tell your doctor if you take it.
Browse the live nail and beauty deals on Half or Nothing, all checked at 50 percent off or more. If you are building a wider self-care routine, our guide to oily, dry, or combination skin covers the same ground for your face.
Half or Nothing earns a commission on some links in this post. It does not change the price you pay, and every deal is checked at 50 percent off or more before it goes on the page.
Every pick we've pulled at 50% off or more, in one place.
Visit our Amazon store ›No-makeup makeup for fall 2026 is skin that looks like skin. Here is the skincare-first routine and the four makeup steps, with the deals we verified.
2026-09-06
What causes fine lines, which ingredients have real evidence, a four-step morning routine and five-step evening routine, and how long results take. Plus verified deals.
2026-09-02
How to tell if your skin is oily, dry, or combination, plus a simple routine and the best products for each type, with real deals checked at 50% off or more.
2026-09-01